A saltwater aquarium can completely transform any room. The vivid colors of tropical fish and the graceful sway of coral create a living piece of art. It is no surprise that more homeowners are turning to aquariums as a stunning home decor choice. However, setting one up can feel overwhelming at first, especially if you have never owned a fish tank before.
The truth is that setting up a saltwater aquarium is very manageable when you take it step by step. This beginner aquarium guide will walk you through everything you need to know. From choosing the right tank to adding your first fish, each step is explained in plain, simple language. Therefore, whether you are a complete beginner or a curious enthusiast, this article is the right place to start.
Why a Saltwater Aquarium Is Worth the Effort
Freshwater tanks are simpler to set up. However, they simply cannot match the visual impact of a saltwater aquarium. The fish are more colorful, the corals are more dramatic, and the overall effect is far more striking.
A well-maintained saltwater tank also adds a sense of calm to any space. Studies have shown that watching fish can reduce stress and lower blood pressure. Additionally, a saltwater aquarium works as a natural conversation starter when guests visit. It draws the eye immediately and creates a lasting impression.
Furthermore, as a home decor aquarium, a saltwater tank can anchor an entire room’s design. It fits beautifully in living rooms, home offices, waiting areas, and even bedrooms. The soft, shifting light it produces creates a relaxing ambiance that no other decor element can replicate.
What You Need Before You Begin
Good preparation makes the entire process easier. Before purchasing anything, take some time to research and plan. This will save you money and prevent frustrating mistakes down the road.
Choosing the Right Tank Size
Beginners often assume that smaller tanks are easier to manage. This is actually a common misconception. In saltwater aquariums, larger tanks are more forgiving. A bigger volume of water means that changes in temperature, salinity, and chemistry happen more slowly. This gives you more time to react and correct problems.
A 30 to 55 gallon tank is a great starting point for most beginners. It is large enough to be stable but small enough to fit comfortably in a typical home. Tanks smaller than 20 gallons are not recommended for saltwater setups because the water parameters can shift too quickly.
Picking the Right Location
Location matters more than most people realize. A filled aquarium is extremely heavy. A 40-gallon tank can weigh over 400 pounds when fully set up. Therefore, place your tank on a sturdy, level surface designed for the weight.
Keep the tank away from direct sunlight. Sunlight promotes unwanted algae growth and causes temperature swings. Also, avoid placing it near heating or air conditioning vents. Stable temperature is critical for a healthy saltwater tank.
Essential Equipment for a Saltwater Aquarium
Saltwater aquariums require specific equipment that freshwater tanks do not always need. However, this does not mean the cost is unmanageable. Here is a clear list of what you will need:
- A glass or acrylic tank with a secure lid
- A protein skimmer to remove organic waste from the water
- A reliable filtration system rated for your tank size
- A heater to maintain a stable water temperature between 76 and 80 degrees Fahrenheit
- A thermometer to monitor the temperature daily
- Aquarium lighting designed for saltwater or reef environments
- A hydrometer or refractometer to measure salinity
- A powerhead or circulation pump for water movement
- Live rock or dry rock for biological filtration and decoration
- Aragonite or crushed coral substrate for the tank floor
Additionally, you will need marine salt mix and a large container or bucket for mixing saltwater. Always use RO/DI water, which stands for reverse osmosis and deionized water. This type of water has been purified to remove contaminants that can harm marine life.
Step One: Setting Up the Tank and Equipment
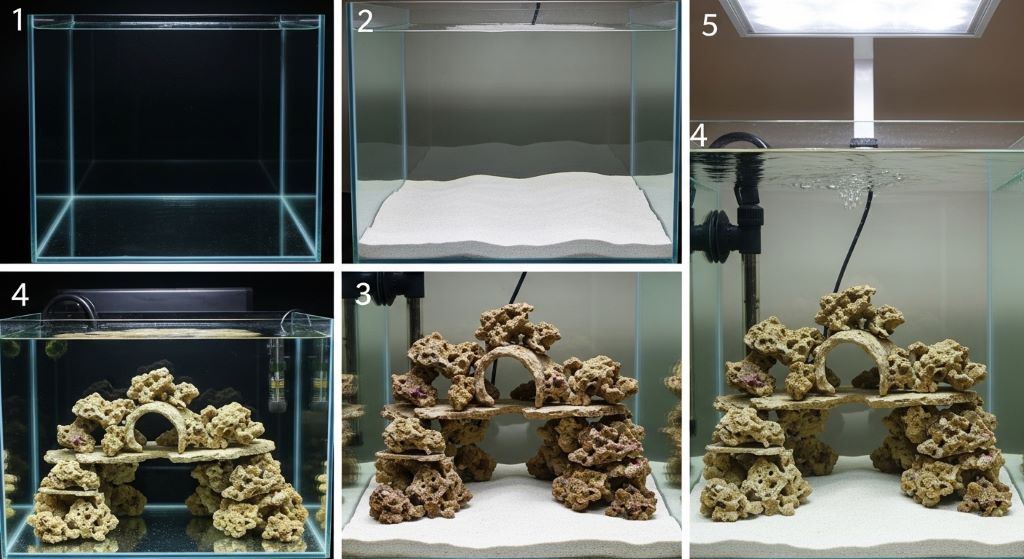
Start by thoroughly rinsing your tank with fresh water. Do not use soap or any cleaning chemicals. Even trace amounts of soap can be toxic to marine life. Rinse everything including rocks, substrate, and equipment before placing them inside.
Next, place your substrate on the tank floor. Aim for a depth of about two to three inches. Then arrange your live rock or dry rock in a way that creates interesting shapes and hiding spots for your future fish. Therefore, take your time here because this arrangement will be the permanent layout of your tank.
Install your heater, filtration system, protein skimmer, and circulation pump according to each product’s instructions. Position the heater near a powerhead so that warm water circulates evenly throughout the tank. Finally, set up your lighting according to the needs of the fish or coral you plan to keep.
Step Two: Mixing and Adding Saltwater
Mix your marine salt with RO/DI water in a separate container before adding it to the tank. Follow the instructions on the salt mix packaging. The target salinity for a fish-only tank is around 1.020 to 1.025 specific gravity. For a reef tank with corals, aim for 1.025 to 1.026.
Use a refractometer for the most accurate salinity reading. Hydrometers are less expensive but can be inaccurate over time. Once the salinity is correct, slowly pour or pump the saltwater into your tank. Be gentle to avoid disturbing the substrate and creating a cloudy mess.
Turn on all your equipment after the tank is filled. The water will likely be cloudy at first. This is completely normal. Additionally, small air bubbles may cling to the glass. These will disappear within a day or two.
Step Three: The Nitrogen Cycle
This is the most important step in the entire process. It is also the one that requires the most patience. The nitrogen cycle is the process by which beneficial bacteria colonize your tank. These bacteria convert harmful ammonia into nitrite, and then nitrite into nitrate. Without this cycle completing, your tank cannot support fish safely.
The cycling process typically takes four to eight weeks. You can seed the cycle by adding a small amount of ammonia to the water. Alternatively, if you used live rock, the bacteria on it will begin the process naturally.
Test your water every few days using a water testing kit. You are looking for ammonia and nitrite levels to rise and then fall to zero. Once both readings stay at zero and nitrate is detectable, your tank has cycled. Therefore, only at this point is the tank ready for fish.
Testing Water Parameters
Throughout the cycling process and beyond, you should test your water regularly. The key parameters to monitor are ammonia, nitrite, nitrate, pH, alkalinity, calcium, and magnesium. A basic test kit covers ammonia, nitrite, nitrate, and pH, which is sufficient for fish-only tanks.
However, if you plan to add coral, you will also need to track alkalinity, calcium, and magnesium. These minerals are consumed by coral as it grows and must be replenished regularly.
Step Four: Choosing Your First Fish
Once your tank has cycled, it is finally time to add fish. However, do not rush to fill the tank all at once. Adding too many fish too quickly will overwhelm the biological filtration and cause ammonia spikes.
Start with one or two hardy species. Clownfish are the classic beginner choice. They are tough, active, and visually striking. Damselfish are also very hardy, though some species can be aggressive. Firefish and royal grammas are other excellent options for beginners.
Add new fish slowly over several weeks. This allows your biological filter to adjust to the increased load. Additionally, quarantine new fish in a separate tank for two to four weeks before introducing them to your main display tank. This prevents the spread of disease.
Fish to Avoid as a Beginner
Some fish are beautiful but very difficult to keep. Mandarins, seahorses, and pipefish require live food and highly specialized care. Lionfish and triggers are aggressive and may eat or harm other tank inhabitants. Avoid these species until you have gained significant experience.
Ongoing Maintenance: Keeping Your Tank Healthy
A saltwater aquarium does require regular maintenance. However, once a routine is established, it does not take long. Here is what a typical maintenance schedule looks like:
- Daily: Check temperature, salinity, and the behavior of your fish. Look for any signs of stress or disease.
- Weekly: Test water parameters and perform a partial water change of 10 to 15 percent. Clean the glass with an algae magnet or scraper.
- Monthly: Clean the protein skimmer, check filtration media, and inspect equipment for wear.
- Every few months: Replace filter media, check water flow rates, and assess the overall health of the tank.
Regular water changes are the single most effective way to maintain water quality. They dilute nitrates and replenish trace elements. Therefore, never skip a water change even when the tank looks healthy.
Common Beginner Mistakes and How to Avoid Them
Every new aquarium keeper makes mistakes. The key is to be aware of the most common ones so you can avoid them from the start.
Rushing the cycling process is the most dangerous mistake. Adding fish before the cycle is complete will almost certainly cause them to die. Patience here is not optional.
Overfeeding is another very common error. Uneaten food breaks down into ammonia and rapidly degrades water quality. Feed your fish only what they can consume in two to three minutes, once or twice a day.
Overstocking the tank is also a problem many beginners encounter. It is tempting to add many fish quickly. However, each fish adds to the biological load of the tank. Overstocked tanks are harder to maintain and fish are more likely to become stressed or sick.
Finally, neglecting to top off evaporated water is a mistake that affects salinity. Water evaporates but salt does not. Therefore, the salinity will rise over time if you do not add fresh RO/DI water regularly to replace what has been lost to evaporation.
Making Your Aquarium a Stunning Focal Point
A saltwater aquarium is far more than a hobby. It is a living piece of decor that evolves over time. As your aquascape fills in and your fish grow, the tank becomes increasingly beautiful.
Choose a background color that complements your interior design. Black backgrounds make fish colors pop dramatically. Blue backgrounds create a deep ocean feel. Additionally, consider the color of your stand and cabinet. A well-chosen stand can integrate the aquarium seamlessly into your room’s style.
Lighting also plays a major role in aesthetics. LED lighting with programmable color modes can simulate sunrise and sunset. This creates a dynamic, shifting effect that enhances the visual appeal throughout the day. For those using their tank as a home decor aquarium, investing in quality lighting makes a significant difference.
Conclusion
Setting up a saltwater aquarium at home is a deeply rewarding experience. It takes planning, patience, and a willingness to learn. However, the results are well worth every effort.
Start with the right tank size, gather the essential equipment, and follow the nitrogen cycle through to completion. Choose hardy beginner fish, stick to a consistent maintenance routine, and avoid common mistakes like overfeeding and rushing the process.
This beginner aquarium guide has given you a solid foundation to work from. Additionally, remember that every experienced aquarium keeper started exactly where you are right now. With each passing month, your skills will grow along with your beautiful tank. Therefore, take that first step with confidence and enjoy the journey of building your own underwater world.
Frequently Asked Questions
1. How long does it take to set up a saltwater aquarium from scratch?
The physical setup of the tank takes one to two days. However, the nitrogen cycling process takes four to eight weeks before fish can be safely added. Therefore, the complete timeline from setup to first fish is typically six to ten weeks.
2. How much does it cost to start a saltwater aquarium?
A basic 30 to 40-gallon saltwater setup typically costs between $400 and $800 for equipment, live rock, substrate, and salt. Fish and coral are additional costs. Ongoing expenses include electricity, salt, RO/DI water, and replacement media. Budgeting carefully before you start prevents unexpected surprises.
3. Can I use tap water in a saltwater aquarium?
No. Tap water contains chlorine, chloramine, phosphates, and other impurities that are harmful to marine life and can cause algae blooms. Always use RO/DI water, which you can purchase from a local fish store or produce yourself with a home filtration unit.
4. What is the easiest saltwater fish for beginners?
Clownfish are widely considered the best beginner saltwater fish. They are hardy, adaptable, and available at most pet stores. Firefish, royal grammas, and watchman gobies are also excellent choices. These species tolerate minor water fluctuations better than more sensitive fish.
5. How often should I do water changes in a saltwater tank?
Most aquarists recommend changing 10 to 15 percent of the tank’s water weekly. This keeps nitrate levels in check and replenishes essential minerals. Some heavily stocked tanks may need more frequent changes. Regular water changes are one of the most reliable ways to maintain a healthy and visually stunning tank.
Related Topics:
How to Cycle a Nano Reef Tank for Beginners: A Step-by-Step Guide
Causes of Slow Drains That Plumbers in Madison AL Regularly Diagnose